Posts filed under 'food and friends'

My Grama Sanom’s Grapeleaves

This is a recipe that I have wanted to make and post on here for ages…but every time I have made them, I have either forgotten to photograph them, or not had a working camera.

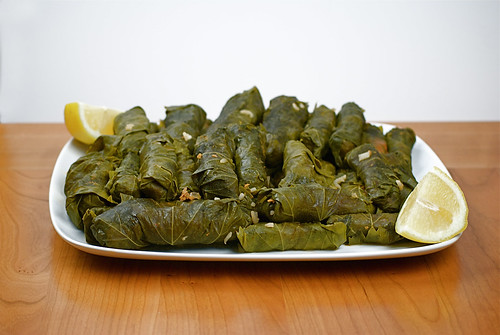
Anyway, these are my Grama Sanom’s grapeleaves! FINALLY!

So there really isn’t one particular story to go with this dish. There were many stories over many years, that I hold close to my heart, and remember every time I make these. Because, whenever I saw my Grama Sanom, we would 9 times out of 10 make grapeleaves together. So this is a recipe that I remember very well. And, as the years go by without my dear Grama, I find that little pieces of her live on in me. For instance, when I look down at my hands rolling these leaves, I notice that they are indeed so very like my grandmother’s hands. And in 50 years, I can see them curling into little arthritic cups…just like hers. A painful, but perfect measuring device. 🙂

Some fond memories I have regarding grapeleaves, were things like driving along in the car with my Grama and Jiddu (Jiddu = Grandpa in Arabic), and hearing my Grama shout to my Jiddu to “Pa! Stop the car!”, and we would come to screeching halt at the side of the road, when my Grama would then calmly get out, walk to the side of the road, and start picking grapeleaves off of the vines growing on the side of the road. I would jump out and help her, knowing that my belly would soon be filled with delicious stuffed grapeleaves.

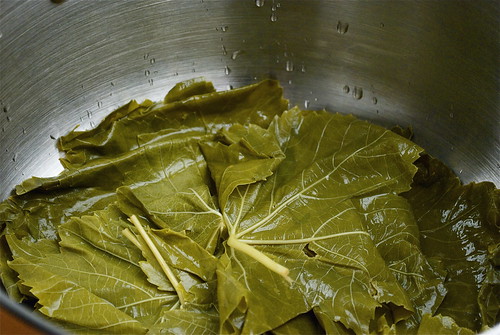
When we would get home, my grama would wash the leaves in cold water removing all the dirt and any stray bugs that may have made their way home with us. After the leaves were rinsed, it was my job to lay all the leaves out so that the veins were facing up, and trim off all the stems while my Grama made the stuffing. (Recipe below). After all the leaves were stacked, vein sides up, and stems cut off, my grama would lay them in a 9×13 baking dish and pour boiling hot water over them until they were covered with it. She would wait until they became their signature dark green color, and were wilted and pliable enough to roll. After they were tender enough, she would drain out all the water and then it was my job to pat them all somewhat dry so they weren’t dripping wet.

Once the leaves were ready, and the meat/rice mixture was ready, it was time to roll! We would sit at the kitchen table for what seemed like hours, and carefully roll out each delicious package. Stacking them up into a big pot. When they were done, she would mix up a bowl of water and tomato paste, stirring it until the paste had fully dissolved. She would then place a plate upside down over the pot of leaves, and pour the tomato mixture over the leaves until the leaves were just covered. She would throw in a few teaspoons of salt, and a little squeeze of lemon…and in around 30 minutes…we would be enjoying our grapeleaves feast.

Let me just say, that I have eaten my fair share of grapeleaves at restaurants over the years, and never have any of them come close to these. Maybe it’s just because the way she made them, was what I became accustomed to, what I grew up eating…but to me, they are even more delicious because they are wrapped up in my memories of her. And so whenever I make them, I look down at my hands…and know she is with me and somewhere up there, smiling down on me for keeping her memory and traditions going. I can’t wait to have kids and grandkids so that I can share this tradition with them.

In the meantime, I am sharing it with you! So please enjoy them!

Grapeleaves
Recipe from Mary Sanom

2 lbs. ground chuck (you can also use ground turkey, but if you do I like to add a little olive oil for some fat)
1 lb. long grain white rice
1 small onion (finely diced)
1 small green pepper (finely diced)
1 clove minced garlic
8 oz tomato sauce
8 oz tomato sauce or paste
Salt/Pepper to taste
Grapeleaves (from the side of the road! OR you can buy them in the jar at the grocery store in the ethnic food aisle, but they aren’t as tender as fresh picked!*)
1 lemon

Instructions:

  • Mix ground chuck, rice, onion, green pepper, garlic and tomato sauce in large bowl. Season to taste with salt and pepper. (I use around a teaspoon, perhaps a little more). I usually just take a little bite of this mixture to make sure it is seasoned correctly, which freaks a lot of people out to eat raw meat, but I’ve been doing it all my life, and never once have I fallen ill from this. 😉
  • Pour in some tomato sauce enough to moisten the meat. You want the meat mixture to be slightly moist, but not so it’s so wet that it’s falling apart
  • Place enough grapeleaves in the bottom of a large pot to cover the bottom of the pot. This will keep the grapeleaves from sticking to the bottom of the pot and burning.
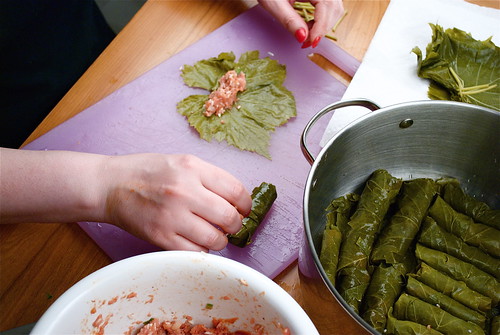
  • Lay out a grapeleaf with the vein side up. Place a small amount of the beef and rice at the bottom 1/3 of the leaf (see photo above), tuck in the sides of the leaves over the meat, and begin to roll up like a cigar
  • Continue rolling your grapeleaves, and laying them in rows on the bottom of the pot, which has been lined with unfilled leaves. When your first layer of grapeleaves has lined the bottom of the pot, you want to start the new layer in the opposite direction, so that the rows criss-cross each other. This will allow the liquid to get to all the leaves easier than it would if they were all going the same direction and packed in tightly together
  • Keep rolling up all your leaves, and stacking the layers, until there are no more leaves/or no more filling/or your pot is full! I never like to fill the pot more than 3/4 with grapeleaves to allow room for the liquid, the plate, and for the liquid to boil and bubble up over the leaves without spilling out of the pot
  • Once you’ve got your leaves all rolled, place a plate upside down over the leaves. This will keep the leaves from floating during cooking, and coming unrolled.
  • In the bowl that your meat mixture was in, scoop out a 8 oz can of tomato paste and mix with enough water to cover your grapeleaves
  • Pour the tomato/water mixture over your leaves until they are just covered.
  • Add a teaspoon or so of salt, and a squeeze of half a lemon into the pot
  • Cover the pot with a lid, and bring the leaves and liquid to a boil, then reduce heat to medium, and let cook for about 30 minutes or until meat is cooked thru and rice and leaves are tender (if you have a lot of leaves, this may take longer – to test, just take out a leave from the top of the pot and taste it)
  • Once your leaves are cooked, remove from heat. Take out the plate, and start removing your grapeleaves with a pair of tongs, arranging them on a pretty serving platter!
  • DIG IN! They will be super tender and moist and full of flavor.
  • I like to reserve the rest of the sauce from the pot, and use a little bit of it to pour over leftover leaves before I reheat them in the microwave

I hope you enjoy my Grama Sanom’s recipe for Syrian grapeleaves!
Click here to see the whole photo set on my flickr!

*If you do buy grapeleaves from the jar, make sure that you rinse them thoroughly and pat them dry. Also, you CAN freeze fresh grapeleaves, but only after they have been wilted with boiling water, just pat them dry and put stacks of them into ziplock bags and throw them in the freezer. These will last you through the winter months, when you can’t pick them. The best time to pick grapeleaves in Michigan is during July, early August, when they are big enough, but haven’t been eaten by all the bugs.

4 comments February 3rd, 2011
A New Take on Mujadara!

This is a recipe that I recently got from my dear friend, Stevie G. He is a super healthy eater, and I always try to emulate his diet, since it’s very healthy, and VERY tasty. He had a bunch of our friends over for a post-holiday dinner last month, and this dish was among the very delicious recipes that graced the plentiful table.

The simplicity lies in the fact that all the ingredients are pre-cooked, and it’s really just toss in a pan, heat and serve. The whole thing takes about 10 minutes to make, if that. However, you really need a Trader Joe’s Market for this recipe (or some other market that carries pre-cooked rices and lentils) if you don’t want to spend an hour just pre-cooking those ingredients.

Ok…so here we go!

Mujadara
Recipe from: Stephen Gemignani

Ingredients:
1 package Trader Joe’s Pre-cooked Black Lentils (found in produce section)
1 package Trader Joe’s Pre-cooked Wild Rice (16 oz)
1 package Trader Joe’s Pre-cooked Brown Rice (10.5 oz)
1 bag Trader Joe’s Frozen Peas
1 package Trader Joe’s Unsalted Dry Toasted Slivered Almonds
Curry
Italian Seasoning
Olive Oil
Minced Garlic
Golden Raisins (optional)
Crispy Fried Onions or Scallions (optional)

Directions:

  • In very large saute pan, add a few tablespoons of olive oil.
  • Add minced garlic and saute until oil is infused
  • Add black lentils, brown rice, wild rice and stir until clumps have broken down
  • Add half a bag of the peas, and half a bag of the slivered almonds, and stir. If you’d like, you can add a quarter cup or so of golden raisins at this point as well.
  • Add curry and italian seasoning to taste, and stir to combine well.
  • Add a little olive oil (or a bit of water – if you are being super healthy) as you are sauteing to keep things moist and keep from drying out
  • Saute until all ingredients are heated through
  • Once plated, you can sprinkle with some crispy fried onions or scallions

Enjoy!

Add comment February 16th, 2009

Vegetarian Hamin

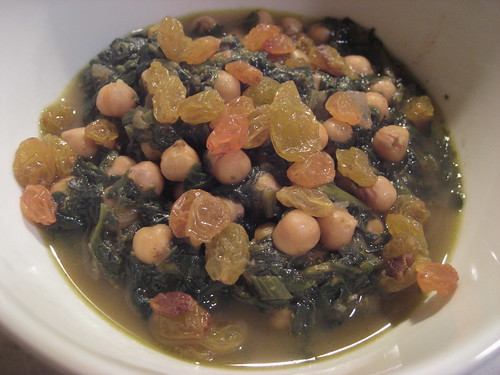
A long time ago now…my friend Annabel was teaching a cooking class and invited me to be her prep cook. At that class, she made this delicious dish. And whenever I am feeling like I need a little love from Annabel, I will make it. It’s super healthy, hearty, and a perfect dish for a cold winter’s day.

Vegetarian Hamin
Recipe from Annabel Cohen

INGREDIENTS:
3 Tbsp Olive Oil
1 large onion, chopped in a small dice
2 cloves garlic, minced
3 cups chick peas (canned is fine), drained
2 – 10 oz packages frozen spinach (or collard greens) thawed, and drained
2 tsp. curry powder, or to taste
1 tsp. cinnamon
1/ tsp. allspice
salt and pepper to taste
golden raisins (optional)

RECIPE INSTRUCTIONS:
In an ovenproof large pot or Dutch oven, heat the oil over medium-high heat. Add onions and garlic and sauté until translucent. Add the chickpeas, greens, salt, pepper, curry powder, cinnamon and allspice. Stir until combined. Add enough water to reach half way up the mixture. Place in a 350ºF oven and cook for 1 hour, stirring occasionally. The mixture should be slightly soupy. Adjust seasonings and serve alone with golden raisins OR over brown rice. Makes 8 servings.

Add comment December 11th, 2008

Mexican Chocolate Icebox Cookies

I work with this amazing bakestress. Her name is Raquel (aka ROK, because she DOES ROCK!), and she makes hands down the most delicious, creative homemade scratch cakes I’ve ever eaten. 

See her website here

and

Her flickr page here.

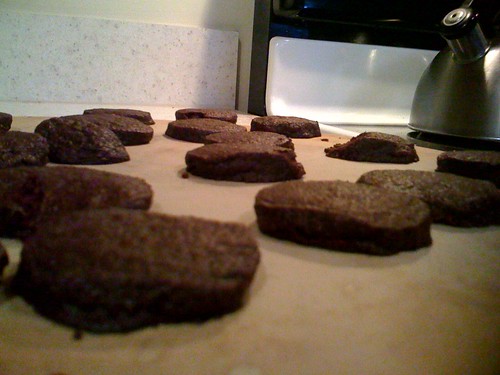
Anyway, in addition to her amazing cakes, she’ll also just sometimes bake and bring in random treats. A week or so ago, she brought in these UNREAL yummy Mexican Chocolate Icebox cookies, and of course I just had to have the recipe. Be forewarned they are slightly spicy (but not crazy, just a little bit of heat, which you can adjust to your taste).

Mexican Chocolate Icebox Cookies
Recipe from Raquel Salaysay

INGREDIENTS:

1/2 cup flour
3/4 cup quality dutch-process unsweetened cocoa (IMPORTANT-don’t use hersheys, get a good quality dutch cocoa for these)
3/4 tsp. ground cinnamon
1/2 – 3/4 tsp cayenne (here is where you can adjust to your liking)
1/4 tsp. salt
1/4 tsp. freshly ground pepper
1 cup sugar
1 1/2 tsp. vanilla extract
1 egg
12 Tbsp. cold unsalted butter, cut into small pieces

RECIPE INSTRUCTIONS:

  • Whisk flour, cocoa, cinnamon, cayenne, salt, and pepper together in a medium bowl and set aside.
  • Put sugar, vanilla, and egg into large bowl and beat with electric mixer on high speed until thick and pale, about 3 minutes.
  • Add butter and continue to beat on high speed until smooth, about 3 minutes more.
  • Using your fingers, work flour mixture until dough is just combined. Don’t worry, it’s so supposed to be super sticky on your hands. Oh well, you’ll just have to lick it off.
  • Divide dough in half and roll each half into a 9″ log. Wrap each log in parchment paper, twisting ends tightly to make a uniform cylinder.
  • Freeze dough logs for at least 3 hours, and as long as overnight
  • Preheat over to 350º. Unwrap dough and slice each log into 1/3″ thick rounds.
  • Place rounds 1/2″ apart on parchment paper-lined (or silicon liner) cookie sheets.
  • Bake cookies until slightly puffed and tiny cracks appear on surface, about 8-9 minutes.
  • Transfer immediately to cooling rack, being careful not to crack cookies.
  • Enjoy little bites of spicy chocolate heaven.

Thanks, Rok, for this super tasty recipe!

Add comment November 27th, 2008

Indian Cooking Class with Sangeeta!

Every so often, some friends and I get together and do little cooking classes. This time we did an Indian class at my Sheila’s house in Ann Arbor, on a beautiful game day Saturday afternoon! 🙂 FUN. My friend, Sangeeta, from back in the days when I worked at Organic, was teaching the class. It was great to see her again after so many years! We started out making a ton of different appetizers that all started out from the same potato/cilantro/spice mixture. We got to see how many variations of an Indian dish could be made from a simple base of potatoes. We also made some chicken dishes and some other vegetarian dishes and curries.  

I love these days spent in the kitchen with great friends. It’s so completely relaxing, and eases the mind of all of life’s little stresses. We talk about love, and children, and work, and dreams. It’s just really special to have friends that share in your interests and your life, coming together to make an amazing meal together, and learn about foods that I could have never made from a recipe or a cook book. 

Everyone should definitely try to get some of their good friends together, in a kitchen for a Saturday. It will for sure cure anything that ails you.

Masala Chicken
recipe from Sangeeta Khalsa

INGREDIENTS:
1 c chopped red onion
2 T olive oil
Garlic/ginger paste
Hot chili
3 tomatoes, chopped
½ t. turmeric
½ t. garam masala
½ t. cayenne pepper
2 t. coriander
3 T tomato sauce
Whole chicken, cut up into pieces
1 c. water or yogurt

INSTRUCTIONS:

Heat the olive oil in a large stock pot. Add the red onions, garlic, ginger (pastes) and hot chilies. Sauté in a pan until the onions caramelize, adding water or yogurt when necessary. Add the rest of the ingredients to the pan, cover and let simmer for 1 hour or until chicken is done or pressure cook it (less than 15 minutes)

Add comment October 5th, 2008

Previous Posts


Calendar

September 2024
S M T W T F S
1234567
891011121314
15161718192021
22232425262728
2930  

Posts by Month

Posts by Category