Archive for February, 2009
Happy Valentine’s Day!
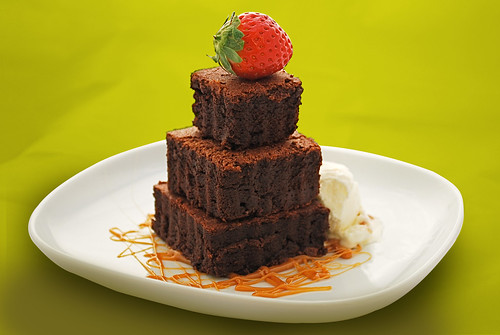
The February 2009 challenge is hosted by Wendy of WMPE’s blog and Dharm of Dad ~ Baker & Chef. We have chosen a Chocolate Valentino cake by Chef Wan; a Vanilla Ice Cream recipe from Dharm and a Vanilla Ice Cream recipe from Wendy as the challenge.
This month’s challenge was super quick and easy. I kept things simple and just garnished the cake and ice cream with a strawberry, and melted caramel. This cake was DELICIOUS. I would highly recommend this is you are strapped for cash and time. With only three ingredients, it was inexpensive, but tasted ridiculously rich and decadent. YUM!!!

Enjoy the recipes below!
Chocolate Valentino
Preparation Time: 20 minutes
16 ounces (1 pound) (454 grams) of semisweet chocolate, roughly chopped
½ cup (1 stick) plus 2 tablespoons (146 grams total) of unsalted butter
5 large eggs separated
1. Put chocolate and butter in a heatproof bowl and set over a pan of simmering water (the bottom of the bowl should not touch the water) and melt, stirring often.
2. While your chocolate butter mixture is cooling. Butter your pan and line with a parchment circle then butter the parchment.
3. Separate the egg yolks from the egg whites and put into two medium/large bowls.
4. Whip the egg whites in a medium/large grease free bowl until stiff peaks are formed (do not over-whip or the cake will be dry).
5. With the same beater beat the egg yolks together.
6. Add the egg yolks to the cooled chocolate.
7. Fold in 1/3 of the egg whites into the chocolate mixture and follow with remaining 2/3rds. Fold until no white remains without deflating the batter. {link of folding demonstration}
8. Pour batter into prepared pan, the batter should fill the pan 3/4 of the way full, and bake at 375F/190C
9. Bake for 25 minutes until an instant read thermometer reads 140F/60C.
Note – If you do not have an instant read thermometer, the top of the cake will look similar to a brownie and a cake tester will appear wet.
10. Cool cake on a rack for 10 minutes then unmold.
Dharm’s Ice Cream Recipe – Classic Vanilla Ice Cream
Preparation Time: 30 minutes
Recipe comes from the Ice Cream Book by Joanna Farrow and Sara Lewis (tested modifications and notes in parentheses by Dharm)
Ingredients
1 Vanilla Pod (or substitute with vanilla extract)
300ml / ½ pint / 1 ¼ cups Semi Skimmed Milk – in the U.S. this is 2% fat (or use fresh full fat milk that is pasteurised and homogenised {as opposed to canned or powdered}). Dharm used whole milk.
4 large egg yolks
75g / 3oz / 6 tbsp caster sugar {superfine sugar can be achieved in a food processor or use regular granulated sugar}
5ml / 1 tsp corn flour {cornstarch}
300ml / ½ pint / 1 ¼ cups Double Cream (48% butter fat) {in the U.S. heavy cream is 37% fat)
{you can easily increase your cream’s fat content by heating 1/4 cup of heavy cream with 3 Tbs of butter until melted – cool to room temperature and add to the heavy cream as soon as whisk marks appear in the cream, in a slow steady stream, with the mixer on low speed. Raise speed and continue whipping the cream) or use heavy cream the difference will be in the creaminess of the ice cream.
1. Using a small knife slit the vanilla pod lengthways. Pour the milk into a heavy based saucepan, add the vanilla pod and bring to the boil. Remove from heat and leave for 15 minutes to allow the flavours to infuse
Lift the vanilla pod up. Holding it over the pan, scrape the black seeds out of the pod with a small knife so that they fall back into the milk. SET the vanilla pod aside and bring the milk back to the boil.
2. Whisk the egg yolks, sugar and corn-flour in a bowl until the mixture is thick and foamy. 3. Gradually pour in the hot milk, whisking constantly. Return the mixture to the pan and cook over a gentle hear, stirring all the time
4. When the custard thickens and is smooth, pour it back into the bowl. Cool it then chill.
5. By Hand: Whip the cream until it has thickened but still falls from a spoon. Fold it into the custard and pour into a plastic tub or similar freeze-proof container. Freeze for 6 hours or until firm enough to scoop, beating it twice (during the freezing process – to get smoother ice cream or else the ice cream will be icy and coarse)
By Using and Ice Cream Maker: Stir the cream into the custard and churn the mixture until thick (follow instructions on your ice cream maker)

February 28th, 2009

This is a recipe that I recently got from my dear friend, Stevie G. He is a super healthy eater, and I always try to emulate his diet, since it’s very healthy, and VERY tasty. He had a bunch of our friends over for a post-holiday dinner last month, and this dish was among the very delicious recipes that graced the plentiful table.
The simplicity lies in the fact that all the ingredients are pre-cooked, and it’s really just toss in a pan, heat and serve. The whole thing takes about 10 minutes to make, if that. However, you really need a Trader Joe’s Market for this recipe (or some other market that carries pre-cooked rices and lentils) if you don’t want to spend an hour just pre-cooking those ingredients.
Ok…so here we go!
Mujadara
Recipe from: Stephen Gemignani
Ingredients:
1 package Trader Joe’s Pre-cooked Black Lentils (found in produce section)
1 package Trader Joe’s Pre-cooked Wild Rice (16 oz)
1 package Trader Joe’s Pre-cooked Brown Rice (10.5 oz)
1 bag Trader Joe’s Frozen Peas
1 package Trader Joe’s Unsalted Dry Toasted Slivered Almonds
Curry
Italian Seasoning
Olive Oil
Minced Garlic
Golden Raisins (optional)
Crispy Fried Onions or Scallions (optional)
Directions:
- In very large saute pan, add a few tablespoons of olive oil.
- Add minced garlic and saute until oil is infused
- Add black lentils, brown rice, wild rice and stir until clumps have broken down
- Add half a bag of the peas, and half a bag of the slivered almonds, and stir. If you’d like, you can add a quarter cup or so of golden raisins at this point as well.
- Add curry and italian seasoning to taste, and stir to combine well.
- Add a little olive oil (or a bit of water – if you are being super healthy) as you are sauteing to keep things moist and keep from drying out
- Saute until all ingredients are heated through
- Once plated, you can sprinkle with some crispy fried onions or scallions
Enjoy!
February 16th, 2009

This weekend I had to do a recipe assignment for my nutrition class that I am taking. We basically had to take a recipe that we have made before, and then make it healthier by reducing the fat, cholesterol and sodium, and also try to bring in more vitamins and minerals.
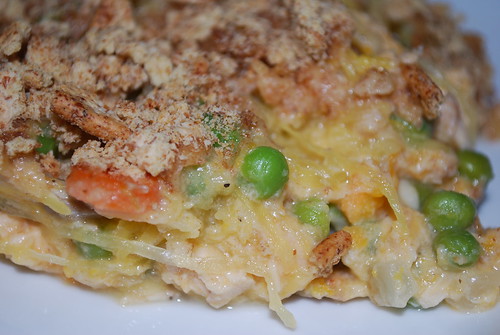
I chose a tuna noodle casserole recipe because it seemed like something I could make the greatest improvement on from the original recipe.
Essentially, by making some simple substitutions and a couple minor additions, I made radical changes to the nutritional values of the dish. I reduced the total calories from 471 to 247 per serving. I also reduced the total fat by 70%, the saturated fat by 78%, the cholesterol by 65% and the sodium by 70%. I also was able to increase the potassium (which helps lower risk of stroke by lowering blood pressure), and increase magnesium which aids in the absorption of calcium and strengthens bones and teeth as well. I increased the Vitamin C in the dish which is an important antioxidant, and the Vitamin A which aids the immune system and helps improve eye health.
Here are the substitutions I made in the recipe:
ORIGINAL RECIPE
6 TB salted butter
3 cups whole milk
3 cups cheddar cheese
2 cups potato chips
9oz egg noodles
3 cans tuna
1/4 cup white flour
1 cup frozen peas
1/2 cup onion
1/4 cup celery
1 tsp salt
NEW RECIPE (makes 10 servings)
5 Tbsp mashed cooked sweet potato (replaces butter)
1 Tbsp olive oil (replaces butter)
2 cups skim milk (replaces whole milk)
1 cup low-fat cheddar (replaces whole fat cheese)
1 cup low-sodium parmesan (replaces whole fat cheese)
1 cup 100% whole wheat low-fat reduced sodium crackers (replaces potato chips)
6 cups spaghetti squash, roasted (replaces egg noodles)
3 cans low-sodium tuna (replaces high sodium canned tuna)
1/8 cup whole wheat flour (replaces white flour)
1 cup frozen peas (no change)
1/2 cup onion (no change)
1/4 cup celery (no change)
deleted the salt
1 cup mushrooms (addition)
1/2 carrots (addition)
RECIPE INSTRUCTIONS:
- Roast your spaghetti squash in a 375º oven for 45 minutes, let set for 15 minutes, then scrape out with a fork to get out the “spaghetti”
- Saute over medium heat in large saucepan celery, carrots, onions, mushrooms, mashed sweet potato in one tablespoon of olive oil til tender (about 4 minutes)
- Add 1/8 cup whole wheat flour to veggies and stir to coat
- Add 2 cups skim milk and simmer until thickened (about 2 minutes)
- Remove pan from heat, and add cheeses and peas, stir until all cheese is melted
- Add spaghetti squash, and make sure it’s fully coated
- Pour mixture into 9×13 baking dish (sprayed with Pam Olive Oil)
- Cover with cup of crushed whole wheat crackers
- Bake at 350º for 20 minutes
Enjoy your healthier (and VERY TASTY i might add!) version of tuna casserole!
February 8th, 2009
I hate coming home late from work, and not knowing what in the world to make for dinner. It’s always nice to have a couple simple ingredients around to scrounge up a super quick, tasty and healthy dinner.
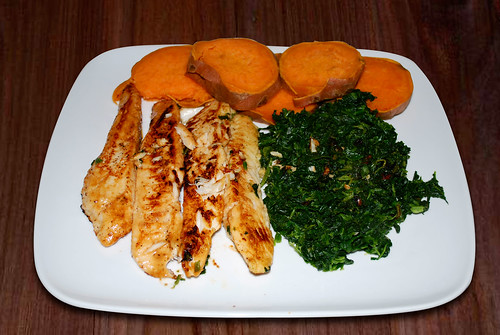
The other night, it happened to be tilapia tenderloins quickly marinated in my favorite salad dressing. Newman’s Own Light Lime Vinaigrette. This is a GREAT marinade for fish and/or chicken. (I use it for fajita’s with some Emeril’s Southwest Spice Mix as well).
Literally, you just marinate the fish in the dressing for 10 minutes. While that is marinating, throw your sweet potato in the microwave, and start steaming your spinch. Then, heat some olive oil in a grill pan, get it nice and hot, and throw on your fish.
Cook it on each side four about 4-5 minutes, and plate on a nice platter with your spinach and sweet potato.
Dinner in 20 minutes! Enjoy!
February 8th, 2009
This month’s challenge is brought to us by Karen of Bake My Day and Zorra of 1x umruehren bitte aka Kochtopf. They have chosen Tuiles from The Chocolate Book by Angélique Schmeink and Nougatine and Chocolate Tuiles from Michel Roux.

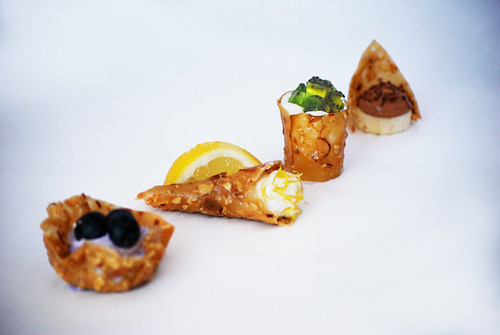


I was SO excited to create these yummy little tuile treats for my very first Daring Baker’s Challenge! It was a super fun challenge, and created a HUGE mess in my kitchen, and burnt my finger really super bad on the sugar, but well worth it at the end of the day. I’m a couple days late in posting this, because work was caarrrrrrrrazy this week….but I finally got to it, and hope you all enjoy it. Please find the recipe for the Nougatine Tuiles below.
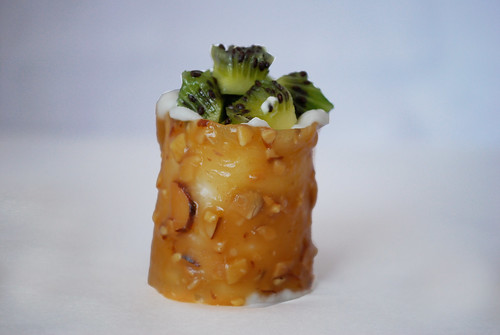
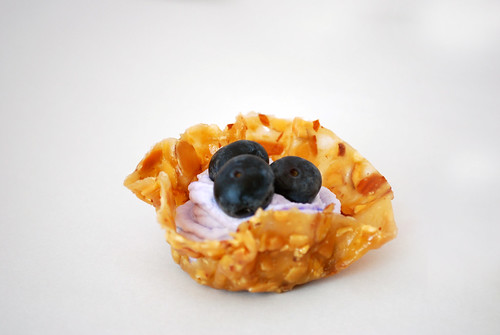
I made four different “shapes” for my tuiles…and accompanied them with four slightly different variations on a theme. I did a flavored mousse for each shape. The little cup was filled with a blueberry mousse, and topped with fresh blueberries…MMMmmm! The cone shape was filled with a lemon mousse, and topped with some fresh lemon zest, and garnished with a slice of lemon. The circle ring shape was filled with a white chocolate mousse and topped with some fresh diced kiwi. And finally, the little triangle tuile was accompanied by a slice of banana, topped with a chocolate mousse and some bittersweet chocolate shavings. YUM! YUM!
Nougatine:
From Michel Roux: Finest Desserts
5.1/4 cups / 500 grams sliced almonds
(or 4.1/3 cups/500 grams slivered almonds)
3.1/3 cups / 660 grams sugar
4 tbs / 60 grams butter (optional)
2 tbs oil (vegetable, sunflower, peanut)
Makes 2.3/4 lbs/1.2 kgs! (This is the yield of the recipe given in the book, feel free to downsize!)
Preparation time: 25 minutes
Preheat oven: 180C/350F
Spread the almonds on a baking sheet and toast in the oven until lightly browned. Cook the sugar in a heavy based saucepan over low heat, stirring gently and continuously with a spatula, until it melts to a light golden caramel. Add the almonds and stir over low heat for 1 minute, then stir in the butter until completely absorbed. (This is not essential, but will give the nougat an added sheen) Pour the nougatine onto an oiled baking sheet.
Shaping: place a bakingsheet toward the front of the warm oven, leaving the door half open. The warmth will keep the cookies malleable. Work with one piece at a time, of a size appropriate to the shape you want. Roll out each piece on a warm, lightly oiled baking sheet or lightly oiled marbled surface. It is essential to work quickly, since the nougatine rapidly becomes brittle. Heat the nougatine in a microwave oven for a few seconds only to soften it if needed.
Roll the nougatine into the appropriate thickness for your desired shape, but never thicker than 1/8 inch or 3 mm. Quickly cut out your chosen shapes using cookie cutters, or the blade or heel of a chef’s knife. To mold the nougatine, drape it very rapidly over the mold so that it follows the shape and contours. Leave until completely cold before removing from the mold.
Or, cut out and using your fingers or a knife, push into folds or pleats… use as a basket, twirl round a knitting needle..
Nougatine based shapes can be made two or three days in advance, Keep them in a very dry place and do not fill with something like a mousse more than 2 hours prior to serving.
Thanks so much to Lisa and Ivonne over at the Daring Bakers for giving me such a cool and fun opportunity to join the ranks! 🙂
February 1st, 2009