Posts filed under 'breads'

This is a recipe that I have wanted to make and post on here for ages…but every time I have made them, I have either forgotten to photograph them, or not had a working camera.
Anyway, these are my Grama Sanom’s grapeleaves! FINALLY!
So there really isn’t one particular story to go with this dish. There were many stories over many years, that I hold close to my heart, and remember every time I make these. Because, whenever I saw my Grama Sanom, we would 9 times out of 10 make grapeleaves together. So this is a recipe that I remember very well. And, as the years go by without my dear Grama, I find that little pieces of her live on in me. For instance, when I look down at my hands rolling these leaves, I notice that they are indeed so very like my grandmother’s hands. And in 50 years, I can see them curling into little arthritic cups…just like hers. A painful, but perfect measuring device. 🙂
Some fond memories I have regarding grapeleaves, were things like driving along in the car with my Grama and Jiddu (Jiddu = Grandpa in Arabic), and hearing my Grama shout to my Jiddu to “Pa! Stop the car!”, and we would come to screeching halt at the side of the road, when my Grama would then calmly get out, walk to the side of the road, and start picking grapeleaves off of the vines growing on the side of the road. I would jump out and help her, knowing that my belly would soon be filled with delicious stuffed grapeleaves.
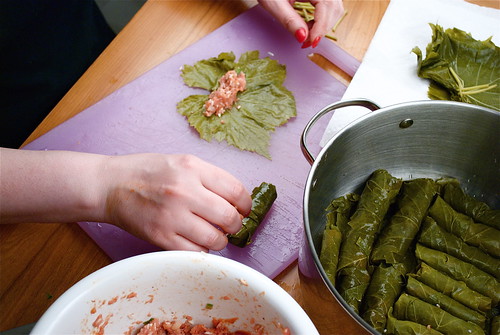
When we would get home, my grama would wash the leaves in cold water removing all the dirt and any stray bugs that may have made their way home with us. After the leaves were rinsed, it was my job to lay all the leaves out so that the veins were facing up, and trim off all the stems while my Grama made the stuffing. (Recipe below). After all the leaves were stacked, vein sides up, and stems cut off, my grama would lay them in a 9×13 baking dish and pour boiling hot water over them until they were covered with it. She would wait until they became their signature dark green color, and were wilted and pliable enough to roll. After they were tender enough, she would drain out all the water and then it was my job to pat them all somewhat dry so they weren’t dripping wet.
Once the leaves were ready, and the meat/rice mixture was ready, it was time to roll! We would sit at the kitchen table for what seemed like hours, and carefully roll out each delicious package. Stacking them up into a big pot. When they were done, she would mix up a bowl of water and tomato paste, stirring it until the paste had fully dissolved. She would then place a plate upside down over the pot of leaves, and pour the tomato mixture over the leaves until the leaves were just covered. She would throw in a few teaspoons of salt, and a little squeeze of lemon…and in around 30 minutes…we would be enjoying our grapeleaves feast.
Let me just say, that I have eaten my fair share of grapeleaves at restaurants over the years, and never have any of them come close to these. Maybe it’s just because the way she made them, was what I became accustomed to, what I grew up eating…but to me, they are even more delicious because they are wrapped up in my memories of her. And so whenever I make them, I look down at my hands…and know she is with me and somewhere up there, smiling down on me for keeping her memory and traditions going. I can’t wait to have kids and grandkids so that I can share this tradition with them.
In the meantime, I am sharing it with you! So please enjoy them!
Grapeleaves
Recipe from Mary Sanom
2 lbs. ground chuck (you can also use ground turkey, but if you do I like to add a little olive oil for some fat)
1 lb. long grain white rice
1 small onion (finely diced)
1 small green pepper (finely diced)
1 clove minced garlic
8 oz tomato sauce
8 oz tomato sauce or paste
Salt/Pepper to taste
Grapeleaves (from the side of the road! OR you can buy them in the jar at the grocery store in the ethnic food aisle, but they aren’t as tender as fresh picked!*)
1 lemon
Instructions:
- Mix ground chuck, rice, onion, green pepper, garlic and tomato sauce in large bowl. Season to taste with salt and pepper. (I use around a teaspoon, perhaps a little more). I usually just take a little bite of this mixture to make sure it is seasoned correctly, which freaks a lot of people out to eat raw meat, but I’ve been doing it all my life, and never once have I fallen ill from this. 😉
- Pour in some tomato sauce enough to moisten the meat. You want the meat mixture to be slightly moist, but not so it’s so wet that it’s falling apart
- Place enough grapeleaves in the bottom of a large pot to cover the bottom of the pot. This will keep the grapeleaves from sticking to the bottom of the pot and burning.
- Lay out a grapeleaf with the vein side up. Place a small amount of the beef and rice at the bottom 1/3 of the leaf (see photo above), tuck in the sides of the leaves over the meat, and begin to roll up like a cigar
- Continue rolling your grapeleaves, and laying them in rows on the bottom of the pot, which has been lined with unfilled leaves. When your first layer of grapeleaves has lined the bottom of the pot, you want to start the new layer in the opposite direction, so that the rows criss-cross each other. This will allow the liquid to get to all the leaves easier than it would if they were all going the same direction and packed in tightly together
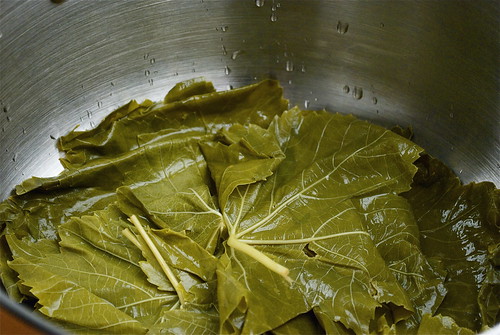
- Keep rolling up all your leaves, and stacking the layers, until there are no more leaves/or no more filling/or your pot is full! I never like to fill the pot more than 3/4 with grapeleaves to allow room for the liquid, the plate, and for the liquid to boil and bubble up over the leaves without spilling out of the pot
- Once you’ve got your leaves all rolled, place a plate upside down over the leaves. This will keep the leaves from floating during cooking, and coming unrolled.
- In the bowl that your meat mixture was in, scoop out a 8 oz can of tomato paste and mix with enough water to cover your grapeleaves
- Pour the tomato/water mixture over your leaves until they are just covered.
- Add a teaspoon or so of salt, and a squeeze of half a lemon into the pot
- Cover the pot with a lid, and bring the leaves and liquid to a boil, then reduce heat to medium, and let cook for about 30 minutes or until meat is cooked thru and rice and leaves are tender (if you have a lot of leaves, this may take longer – to test, just take out a leave from the top of the pot and taste it)
- Once your leaves are cooked, remove from heat. Take out the plate, and start removing your grapeleaves with a pair of tongs, arranging them on a pretty serving platter!
- DIG IN! They will be super tender and moist and full of flavor.
- I like to reserve the rest of the sauce from the pot, and use a little bit of it to pour over leftover leaves before I reheat them in the microwave
I hope you enjoy my Grama Sanom’s recipe for Syrian grapeleaves!
Click here to see the whole photo set on my flickr!
*If you do buy grapeleaves from the jar, make sure that you rinse them thoroughly and pat them dry. Also, you CAN freeze fresh grapeleaves, but only after they have been wilted with boiling water, just pat them dry and put stacks of them into ziplock bags and throw them in the freezer. These will last you through the winter months, when you can’t pick them. The best time to pick grapeleaves in Michigan is during July, early August, when they are big enough, but haven’t been eaten by all the bugs.
February 3rd, 2011
When I was a girl, we used to spend Easter mornings at my Syrian grandparents house. It is one of those family traditions that gets seared into your brain, and the sounds, smells and memories of it, never EVER go away.
My memories of these Easter mornings (although there were sadly too few of them), were of warm baked easter bread, hunks of blue cheese, olives, and the cracking of the eggs, a Syrian tradition called what i can only spell as “ta-hoshing”.
The art of “ta-hosh” is where one person would tightly hold a festively dyed boiled egg in their hand while the other person would very lightly tap the other person’s egg with the top of theirs, trying to crack their opponent’s egg before their own. If one egg got cracked, the eggs were flipped, and the game would continue. The person who cracked both sides of your egg first, got to keep your egg.
My jiddu (grandfather in Syrian) was very highly skilled at the art of the tahosh and he would steal all my eggs within moments of the game beginning.
I was always amazed at the precision and consistency of his skills, until one Easter sunday…I learned his secret. It was all in the way one holds the egg. I never mastered his consistency, but eventually…as i grew older, I managed to steal a few of his eggs before all was said and done.
And for those among us, that felt the need to play dirty at it…my grama had secretly created some false eggs, made from ceramic, that would somehow always end up circulating the room. However, after being burned by this prank before, I quickly learned to always check for the validity of my opponents eggs before the tahosh began.
After the games had simmered down, and everyone had had their fill of the tahoshing…there would be trays of syrian easter bread, warm from the oven, smothered in butter or jam, eaten with a hunk of pungent blue cheese and a peeled hard-boiled egg with salt.
The house was always filled with so many people, as my family on my mom’s side is huge. Made up of literally swarms of brothers, sisters, aunts, uncles, cousins, cousins cousins, grand children, great-grandchidren, and yes…even great-great grandchidren. The hum and buzz of the activity, and the smells of this food permeating my grandparents cozy home…while I played and laughed and ate, those memories? Will remain with me forever. never to escape.
But my jiddu died when I was 11 years old. My grama, Mary, eight years later. And with my jiddu’s passing, so passed our family gatherings and much of our traditions. We tried to keep it up for a while, when my grama was still alive…but the family was growing larger, and moving farther apart, children were growing up and moving on. It’s so sad, but that’s pretty much how it happened. How the traditions I loved so much, got lost. But only for a while!
When I was old enough, and was missing these times spent with my grandparents, I started to seek out the things that reminded me of our time together. I found that a lot of my memories could be rekindled through food. And so I sought them out. These family recipes. Most of them were well-hidden and tightly kept to the dwindling few who could still remember them. These recipes were never written down. They were just done. Remembered like family folk lore, passed from generation to generation.
But sometimes…things get lost. And that’s what started happening to my Syrian family recipes. And to prevent that, I started having my mom help me gather up all her own memories and those of her siblings and aunts, and cousins, and nieces and nephews…and I started to gather them up, one by one. Some of them varied slightly from what I remember my grama’s tasting like, and so I would alter, and test, and taste, and try again and again…until I got them as close as possible to what I remembered.
This recipe came to me from my Uncle. And now, my grama’s easter bread (pronounced ah-das) has been written down into the vault.
And so it is with that, that I share it with you here. So that it never gets lost again. And so that it becomes part of new traditions, for anyone who wishes to make them. I hope you enjoy this bread.
SYRIAN EASTER BREAD
INGREDIENTS:
6 cups flour
1 1/2 TB sugar
2 Tsp Salt
12 oz can of evaporated milk
1 pkg rapid rise yeast (2 tsp)
1 TB. ground mahleb (can get from middle eastern markets)
2 sticks of butter
RECIPE INSTRUCTIONS:
- Dissolve yeast into 1/4 cup warm water and 1 tsp of sugar. Set aside for 10 minutes until bubbly and foamy
- Melt butter in sauce pan on low heat until just melted. Remove from heat and add evaporated milk to pan and stir. Add yeast mixture into the milk/butter mixture and stir to combine.
- Combine all dry ingredients. Add wet ingredients to dry, and knead well (by hand, or with dough hook in kitchen-aid mixer). Cover with wax paper and let rest 15 minutes.
- Knead again and then let rise until double in size. (I usually turn my oven on 200 for 2 minutes, shut it off and then put my dough in the warm oven to rise).
- Divide dough in half and make into two equal balls. Let dough rise again.
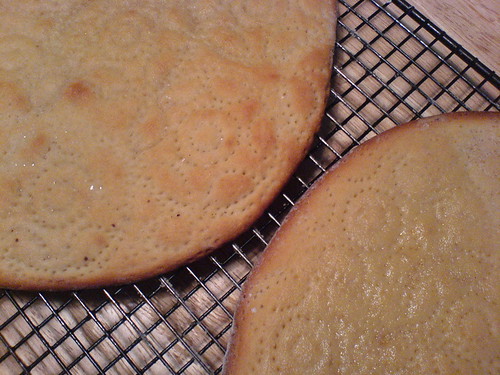
- When the balls have doubled, roll out each ball into a circle to about 1/2 inch thick
- Poke bread dough all over with a fork, or with a bread stamp (found at middle eastern markets)
- Brush with melted butter
- Bake at 350-375º for 20 minutes or until golden. (I let mine bake for 10 minutes on the bottom rack, and then move up to the middle rack for the last 10 minutes of baking)
- Remove from oven and brush with a layer of melted butter
Chef’s Notes:
This bread is great with butter and jam.
To reheat, pop in microwave for about 10 seconds.
Traditionally, in my family, we ate this bread on easter day with blue cheese, olives, and hard-boiled eggs.
July 30th, 2006

Those words were once uttered by Chris Rock. And I say, “No there isn’t, Mr. Rock, indeed there is nothin’ wrong wid dat.”
Now, when it came to cornbread…my Grama Dee was known for just poppin’ a box of Jiffy cornbread mix in the oven, and callin’ that shit a day. Which, yeah I know…not very southern of her…but then again? It WAS pretty dang tasty. Anyway…as I was making my “good luck” beans this year, I didn’t happen to have a box of Jiffy in my vast and expansive pantries just then (SHOCK, i know since just about everything else is in there). I did have, however, a box of yellow cornmeal that was just begging to be joined with a little sugar, milk and eggs. So I scoured the web for a decent cornbread recipe and I stumbled upon a pretty tasty one from Jeremy Jackson found in his book titled “The Cornbread Book” and so I share it with you all here:
SWEET CORNBREAD recipe from Jeremy Jackson’s “The Cornbread Book”
INGREDIENTS (see photo)
1 cup unbleached all-purpose flour
1-cup cornmeal
5 tablespoons sugar
2 teaspoons baking powder
1/2-teaspoon salt
1-cup milk
1/3-cup canola oil
1 large egg, slightly beaten
RECIPE INSTRUCTIONS
- Preheat oven to 400 degrees F. Lightly grease and 8 or 9-inch square pan.
- Sift dry ingredients into mixing bowl. Form a well in the mixture and add the milk, oil, and egg. Stir just until everything is combined – there should still be scattered clumps of flour, about the size of baby peas or BBs.
- Pour the batter into the prepared pan and bake for 24 to 30 minutes, until the cornbread is starting to brown slightly (especially at the edges) and a knife inserted in the middle comes out clean. Serve hot.
The only thing I changed was that instead of the square pan, I used a cast-iron skillet, it just seemed more legit to do it that way. As for the recipe…it was pretty tasty. Could you expect anything else from a mizzoureh-raised hillbilly boy? Nice work, Jeremy.
January 18th, 2006