Posts filed under 'comfort foods'
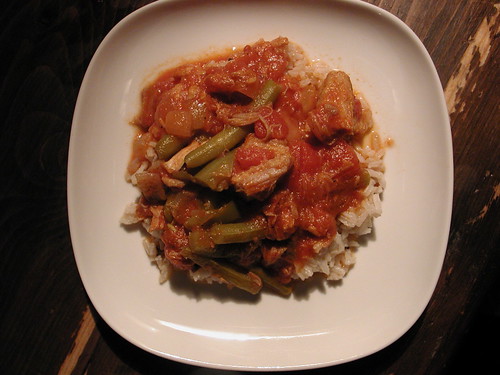
Among the many favorite Syrian comfort foods of mine, is a dish called Lubi Lu. It’s actual name is just Lubi…but my Grama Sanom used to call it Lubi Lu, I think to just make the name funnier.
Lubi Lu is an extremely simple dish to make, but SO flavorful and colorful. It’s a beautiful, warm, comforting dish to prepare on a cold, snowy Sunday just like today.
Essentially all Lubi is, is a stew made up of fresh green beans, tomatoes, green pepper, onion, and pork butt. It is typically eaten over rice, but is very good just eaten right out of a bowl.
There is a very important trick that my Grama Sanom taught my mother, and my mother taught me, and it applies to this recipe as well as any stew. And that secret trick is that when you add the liquid to simmer the meat, (whether it be water, or broth, or wine, etc) it must be boiling before adding it to the browned meat. The result will be meat that is extremely tender and melts in your mouth, as opposed to one that is chewy and tough.
Alright…so on to the recipe…
SYRIAN LUBI LU and RICE
Recipe from my mom, Gerri Foxworthy
INGREDIENTS:
3-4 lb lean pork butt roast (aka pork shoulder, can also use pork loin)
1 onion, chopped into 1/4″ dice
1 green pepper, chopped into 1/4″ dice
3 lb fresh cut green beans, ends trimmed, snapped in half
1 large 28 oz. can diced tomatoes in juices
1 small 6 oz. can tomato paste
Salt and pepper to taste
Boiling water to cover pork and green beans
INSTRUCTIONS:
(see flickr photo set for visual instructions here)
- Cube pork into 3/4 inch cubes, season with salt and pepper and brown meat in a little vegetable oil in dutch over or similar pot
- Add enough boiling water to cover bottom of pan, but do not completely cover meat with it.
- Cover pot and simmer about 30 minutes, or until meat is tender
- Add onion and green pepper, stir.
- Add green beans, stir.
- Add tomatoes and tomato paste, stir.
- Add enough boiling water to almost cover beans, stir.
- Add salt and pepper to taste
- Cover pot and simmer until beans are very tender (about 45 minutes)
- Serve over syrian rice
INGREDIENTS FOR RICE:
4 Tbsp butter, divided
1/4 cup orzo
1/4 cup pine nuts
2 cups rice
4 1/2 cups boiling water
Salt to taste
RECIPE INSTRUCTIONS FOR RICE:
- Melt 2 Tbsp butter in 3 quart saucepan
- Add orzo and pine nuts and saute over medium high heat until lightly browned
- Add rice to orzo mixture and stir until butter coats the rice
- Add boiling water to rice
- Season with salt (I usually use a teaspoon)
- Reduce heat to medium low, cover pot, and let rice cook for 20 minutes
- Remove lid, add last two tablespoons of butter, fluff rice with fork and cover again til butter melts
- Serve with Lubi Lu
Chef’s Notes:
Keep a separate pot of water boiling for both the Lubi and Rice before you begin your cooking, that way you won’t forget!
November 19th, 2006
When I was a girl, we used to spend Easter mornings at my Syrian grandparents house. It is one of those family traditions that gets seared into your brain, and the sounds, smells and memories of it, never EVER go away.
My memories of these Easter mornings (although there were sadly too few of them), were of warm baked easter bread, hunks of blue cheese, olives, and the cracking of the eggs, a Syrian tradition called what i can only spell as “ta-hoshing”.
The art of “ta-hosh” is where one person would tightly hold a festively dyed boiled egg in their hand while the other person would very lightly tap the other person’s egg with the top of theirs, trying to crack their opponent’s egg before their own. If one egg got cracked, the eggs were flipped, and the game would continue. The person who cracked both sides of your egg first, got to keep your egg.
My jiddu (grandfather in Syrian) was very highly skilled at the art of the tahosh and he would steal all my eggs within moments of the game beginning.
I was always amazed at the precision and consistency of his skills, until one Easter sunday…I learned his secret. It was all in the way one holds the egg. I never mastered his consistency, but eventually…as i grew older, I managed to steal a few of his eggs before all was said and done.
And for those among us, that felt the need to play dirty at it…my grama had secretly created some false eggs, made from ceramic, that would somehow always end up circulating the room. However, after being burned by this prank before, I quickly learned to always check for the validity of my opponents eggs before the tahosh began.
After the games had simmered down, and everyone had had their fill of the tahoshing…there would be trays of syrian easter bread, warm from the oven, smothered in butter or jam, eaten with a hunk of pungent blue cheese and a peeled hard-boiled egg with salt.
The house was always filled with so many people, as my family on my mom’s side is huge. Made up of literally swarms of brothers, sisters, aunts, uncles, cousins, cousins cousins, grand children, great-grandchidren, and yes…even great-great grandchidren. The hum and buzz of the activity, and the smells of this food permeating my grandparents cozy home…while I played and laughed and ate, those memories? Will remain with me forever. never to escape.
But my jiddu died when I was 11 years old. My grama, Mary, eight years later. And with my jiddu’s passing, so passed our family gatherings and much of our traditions. We tried to keep it up for a while, when my grama was still alive…but the family was growing larger, and moving farther apart, children were growing up and moving on. It’s so sad, but that’s pretty much how it happened. How the traditions I loved so much, got lost. But only for a while!
When I was old enough, and was missing these times spent with my grandparents, I started to seek out the things that reminded me of our time together. I found that a lot of my memories could be rekindled through food. And so I sought them out. These family recipes. Most of them were well-hidden and tightly kept to the dwindling few who could still remember them. These recipes were never written down. They were just done. Remembered like family folk lore, passed from generation to generation.
But sometimes…things get lost. And that’s what started happening to my Syrian family recipes. And to prevent that, I started having my mom help me gather up all her own memories and those of her siblings and aunts, and cousins, and nieces and nephews…and I started to gather them up, one by one. Some of them varied slightly from what I remember my grama’s tasting like, and so I would alter, and test, and taste, and try again and again…until I got them as close as possible to what I remembered.
This recipe came to me from my Uncle. And now, my grama’s easter bread (pronounced ah-das) has been written down into the vault.
And so it is with that, that I share it with you here. So that it never gets lost again. And so that it becomes part of new traditions, for anyone who wishes to make them. I hope you enjoy this bread.
SYRIAN EASTER BREAD
INGREDIENTS:
6 cups flour
1 1/2 TB sugar
2 Tsp Salt
12 oz can of evaporated milk
1 pkg rapid rise yeast (2 tsp)
1 TB. ground mahleb (can get from middle eastern markets)
2 sticks of butter
RECIPE INSTRUCTIONS:
- Dissolve yeast into 1/4 cup warm water and 1 tsp of sugar. Set aside for 10 minutes until bubbly and foamy
- Melt butter in sauce pan on low heat until just melted. Remove from heat and add evaporated milk to pan and stir. Add yeast mixture into the milk/butter mixture and stir to combine.
- Combine all dry ingredients. Add wet ingredients to dry, and knead well (by hand, or with dough hook in kitchen-aid mixer). Cover with wax paper and let rest 15 minutes.
- Knead again and then let rise until double in size. (I usually turn my oven on 200 for 2 minutes, shut it off and then put my dough in the warm oven to rise).
- Divide dough in half and make into two equal balls. Let dough rise again.
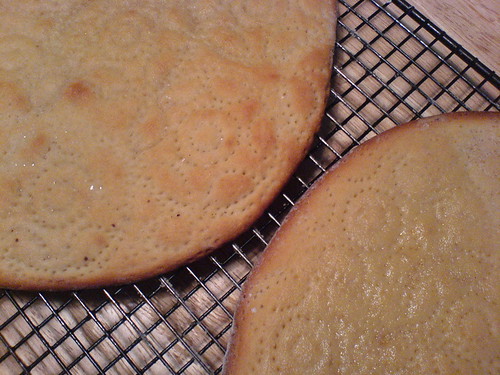
- When the balls have doubled, roll out each ball into a circle to about 1/2 inch thick
- Poke bread dough all over with a fork, or with a bread stamp (found at middle eastern markets)
- Brush with melted butter
- Bake at 350-375º for 20 minutes or until golden. (I let mine bake for 10 minutes on the bottom rack, and then move up to the middle rack for the last 10 minutes of baking)
- Remove from oven and brush with a layer of melted butter
Chef’s Notes:
This bread is great with butter and jam.
To reheat, pop in microwave for about 10 seconds.
Traditionally, in my family, we ate this bread on easter day with blue cheese, olives, and hard-boiled eggs.
July 30th, 2006

my friend john and i love snacks. and whenever we would visit his mom at her cozy cute house, she would always make us little snacks and treats. bowls of tiny nuts, or crunchy things. little tiny fruits. or crispy shrimps in panko crumbs with yummy dips etc.
well, one day…john and i were looking for something a little more sub-sub-substantial (a can of beans, some black-eyed peas, some nescafe and ice??)…
no way! we were looking for some spicy grilled cheeses on texas toast. we’d gotten thee idea from one that we’d shared at some weird stand at a figure-8 race once. and john just got it in his head that we needed to duplicate this comforty spicy treat. so we went out to the store, furiously perusing the isles for the perfect bread, cheese, toast, butter, and yum…spicy peppers.
when we arrived at his mom’s with groceries in tow, she thought we were both nuts. but we perservered. we got out pots, pans and spatulas, and concocted our tasty sandwiches with a dance in our pants. because gosh darn it…cooking with friends? is super fun.
anyway…those sandwiches we made were pretty dang yum. but after experimenting with some ideas i had on the subject…i found the following recipe. i think it’s pretty tasty. and i hope you like it.
SPICY GRILLED CHEESE recipe altered from one found on Epicurius
INGREDIENTS:
3-ounces tomato paste
2 tablespoons chopped canned chipotle chilies
1 tablespoon light molasses
6 slices sourdough bread – cut to texas toast thickness
6 thick slices of cheddar cheese (i like extra sharp…but you can use mild, or even american cheese if you want)
2 plum tomatoes, cut into 1/4-inch-thick slices (optional)
1 small red onion, thinly sliced (optional)
1/2 cup fresh cilantro leaves (optional)
lots of butter (of course) room temperature
RECIPE INSTRUCTIONS:
- Blend tomato paste, chilies, and molasses in processor until smooth.
- Spread tomato/pepper mixture over 1 side of each bread slice.
- Arrange 3 bread slices, sauce side up, on work surface. Divide half of cheese among bread slices.
- If desired, top with tomatoes, then onion, cilantro, and remaining cheese.
- Cover sandwiches with remaining bread slice, sauce side down. Spread butter on outside of sandwich tops and bottoms.
- Heat pan or griddle over medium heat.
- Cook until bread is golden and cheese is melted, about 5 minutes per side.
Makes 3 sandwiches
July 30th, 2006

Grama Dee grew up during the Great Depression in one of the most poverish towns in Missouri. They raised rabbits and chickens to eat and growing up in such dire straits as she did, she was not one to ever waste food.
Many times I would watch her in disbelief as she scraped the mold off some old bread and eat it with a slab of butter. When she caught my looks of shock and horror, she would roll her eyes at me and say…”Julie Anne, a little mold never hurt anyone.” I begged to differ…but that’s beside the point, because old habits die hard, and for her…wasting food just wasn’t an option. Many times she would scrape our plates clean, and then…when the last spoonful of green beans just could not be eaten…she would save it in an old margerine tub, put it in the refrigerator to be eaten another time.
This used to drive my mom crazy because whenever my grama came over for dinner (which was a few times a week at least), we’d have 20 margerine tubs full of food that NOONE was ever gonna touch. But then Grama Dee would come over again the next day or so, and sure enough…she’d take out that margerine tub full of those 10 green beans and eat them. So nothing ever really did go to waste.
Anyway…one of the most important food memories that I (and everyone in my family) has of my Grama Dee, is her most beloved Depression staple, ketchup spaghetti. From the time I could slurp down a noodle, I’ve been eating it. And it’s my dad and cousin Brian’s favorite food. I’m not kidding, it really is. There are so many memories surrounding this one dish, that they’d be far too many to write here.
But one of the most comical, was the first time my poor brother-in-law, Mark encountered this infamous dish. Now, Mark is 100% Italian (or EYE-TAIL-YUN as Grama Dee used to say) and he was horrified that a spaghetti noodle could be so abused. IN EVERY WAY. But he was a good sport, and for my sister (and our grama) he obliged us all, and tried a bite. After his first gag reflex kicked in…my dad howled with laughter, and my poor grama was never able to convince Mark to eat another bite, no matter how many times she tried.
Yep, true enough, ketchup spaghetti is not for the weak of palette, because unless you were raised on the stuff like I was, I can’t imagine most people would react much different than Mark did. But as gross as it must seem to most, it is the one food I hold dearest to my heart, and will never, EVER tire of eating until the day I die.
So I probably don’t have to tell you that ketchup spaghetti was born out of the Depression because all it required was spaghetti and ketchup and of course, the hillbilly requirement to any dish…BUTTER.
Times were tough, and that’s all I know. My grama used to tell me that when her family did happen to have a few extra pennies, they would fancy it up with some sugar, onion and ground beef. But most of the time, it was just simply noodles and ketchup. While my grama was known to mix it up every once in a while and make it with elbow macaroni, for my purposes here, I’d like to keep it real, and stick with the way she usually made it – with spaghetti noodles. So here it is…(and I’m giving you the fancified version, with the onion and ground beef, and if you’re too poverish for that, then you can just omit those from the recipe)…
KETCHUP SPAGHETTI recipe from Doris Foxworthy
INGREDIENTS: (see photo)
1/2 lb Spaghetti
1 24 oz bottle of Heinz Ketchup
1 lb Ground Beef
1 Medium Onion
1/4 stick Butter
1 Tbsp Sugar
Salt to taste
Pepper to taste
RECIPE INSTRUCTIONS:
- Cut up medium sized onion to a small dice.
- Cook the spaghetti according to package directions.
- While the spaghetti is boiling, heat a large skillet over high heat and throw in the diced onion with a little bit of butter.
- Saute the onion until it’s just translucent (not brown) and then add the ground beef.
- Saute the beef mixture until the meat is cooked through.
- Drain the cooked spaghetti and return to pot.
- Combine beef mixture and spaghetti.
- Squeeze in about 3/4 of the bottle of ketchup until the noodles are good n’ saucy then add the butter, sugar, salt and pepper to taste.
- Heap a pile of noodles on your favorite plate and see what all the fuss is about.
I really, really hope that you like this ketchup spaghetti, but if you don’t? Well, I won’t feel so bad, as you probably only wasted less then $6.
January 18th, 2006
Six months after my Grama Dee passed away, my family was a sad mess. It was the first time in all our lives, that we’d not had our beloved grandma around to prepare us our New Year’s Day feast. And to add to that gloom, it was also the first anniversary for me and my siblings of my father telling us that he was divorcing our mother. Needless to say, January 1st, 1999 was not the happiest of days for me.
So in order to give myself a little bit of comfort, I decided that I would make my own little New Year’s Day feast. One of the essential menu items being my grama’s “squash” as she called it. But unfortunately, I’d never learned how to make my grama’s squash. So I furiously went through all my recipe cards she’d sent me over the years, and then realized that I did not have it. I really did not know how to make her squash. And when that fact hit me, well…I guess you could say that I had a bit of a meltdown. My back slowly slid down the front of my refrigerator, until my body was collapsed into a heap on the floor of my tiny apartment kitchen. My body racked with sobs, missing my grama, and our family traditions, wanting so much for my mom and dad to be together again, and feeling just plain miserable that our family had deteriorated so much in one short year.
Then somehow, the tears stopped, and it occurred to me that I was being stupid, because of course my Aunt Fran would know how to make Grama’s squash! She was her only daughter, and my Grama Dee had lived with my Aunt Fran and her family for over 20 years! Excitedly, I called up my aunt and said “Aunt Fran, I’m really sad. I want to make grama’s squash, but I don’t know how.” She cracked up laughing and said “Well, Julie Anne, all it is, is a can of pet milk, a half stick of butter, and some boiled yellow squash sliced up in a pot.”
I was dumbfounded. Something so tasty? THAT SIMPLE? No way. But yes, it’s true. I found out, that some of the tastiest things are no more than a can of pet milk and a stick of butter, plus a vegetable or two.”Sweetie…that’s it. And Grama Dee used to like a lot of pepper, so don’t forget to add lots of pepper.” I sniffled…”I remember. I won’t forget.”
And so, here it is. A recipe so simple, even my dad could make it (and he barely knows how to open a can of Campbell’s).
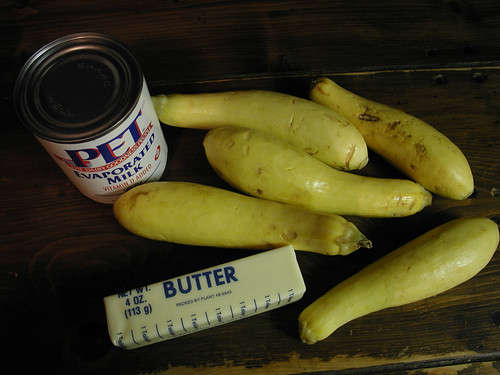
BUTTERED SQUASH recipe from Doris Foxworthy
5-6 small yellow squash
1 can pet milk
1/2 stick butter
dash salt
dash black pepper
RECIPE INSTRUCTIONS
- Slice up your squash, in about 1/4″ slices.
- Add squash to a pot of boiling water (a medium-sized saucepan will do the trick).
- Boil until squash are tender, then drain.
- Return squash to pot, and add pet milk, butter, salt and pepper.
- Bring to a boil, reduce heat to low and let simmer for 20 minutes stirring occasionally until sauce thickens slightly, and squash begins to break down
- Ladle a huge spoonful into your favorite bowl, and enjoy!
January 18th, 2006
Next Posts
Previous Posts