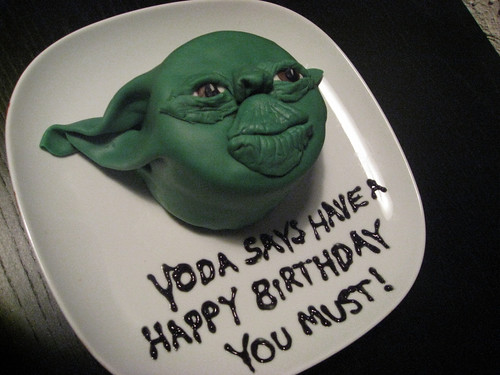
Yoda Says “Have a Happy Birthday You Must”
So…it was about time that I attempted to create my first fondant cake, right? And what better reason than for my boyfriend’s 34th birthday!
I mean, I’ve been wanting to do one for a long time, but the fear of using fondant kept me away. But, to all those harboring the same fears I am telling you straight up, DON’T BE SCARED.
Once I got into it, it was really very easy and more importantly? SUPER FUN.
I decided to go with a Star Wars themed cake, since my boyfriend is an illustrator and 99% of his work is Star Wars related. I decided on Yoda because he seemed the easiest to pull off. He is all green practicallly, and has hard-to-miss features. So even if my attempt was a complete and utter disaster, chances were that it would still be somewhat recognizable.
I also knew that the cake would only be viewed/eaten by my boyfriend and I, so I didn’t want to make a huge cake, but I wanted something bigger than a cupcake too. So I compromised, and bought a couple 4.5″ spring form pans and went with a 2-layer 4.5″ round cake.
Planning the actual layout of the face wasn’t that difficult. I knew my skill level was definitely beginner, and so I kept things very simple. Two eyes, a nose, and a mouth, and of course those cute Yoda ears!
The ears presented the biggest problem, as I wasn’t sure how I was going to attach them to cake. I thought at first, that I would make them out of the fondant, and somehow use toothpicks to secure them in place once they had hardened up.
After I had a plan in place, things went pretty smoothly. I baked my cake (per package directions). Hey, boxed cake is pretty much foolproof, and I didn’t want the hassle of a homemade cake recipe going awry since I knew the fondant part would be tricky enough. So I kept the cake itself simple! And box cake is just tasty, come on, admit it.
After the cake was baked, I began to color and flavor my fondant. I added a few drops at a time (a little dye goes a LONG way, btw). Once I was cool with the color, I just kept kneading the color in until all of it was incorporated into a smooth mass, with no color streaks in it.
After I was finished coloring the green fondant, I rolled out a 12″ disc about an 1/8″ thick. This was what I was going to use to cover the cake, but before I did, I had to frost my cake to give the fondant something to adhere to. (It’s technically called a crumb coat).
I took my tiny cakes out of their cake pans, and cut the tops of the cakes completely even with a knife.I place the bottom layer on a cutting board, and frosted just the top of it. Then I added the 2nd layer, and frosted the entire cake with a very even layer of frosting. Now, I was ready for my fondant…
I carefully rolled up the fondant disc, and gently unrolled it onto the cake…and what happened next…was simply the best fluke ever. As I was smoothing on the fondant to the cake, I started smoothing it down in the front, and realized that the ears, could be created just by keeping the drapes of fondants on the sides. SO COOL. What a happy mistake.
After that was done, I just had to create the eyes, nose, and mouth. I printed out some images of Yoda that I found on Google Images, and used it to create the rest of the pieces.
For the eyes, I began with taking some of the white fondant, and making two white discs for the eyeballs. Then I colored just a tiny bit of the white fondant with some black dye, and another tiny bit of the white fondant with brown fondant. (These I used to make the irises and the pupils). I also added a tiny fleck of white fondant over the pupils to make them a little more realistic. Once I had the eyeballs done, I used some more green fondant to shape the upper and lower eyelids. I did the best I could, and created the “folds” of his lids by cutting lines into the fondant to look like wrinkles.
On to the nose. This was really just shaped out as close as I could get to the reference, and again, created some wrinkles with a knife.
For the mouth, I made two pieces. The upper part, and lower part. After I shaped them, I added more wrinkles with a knife.
I attached the pieces of the face using a simple mix of water and powdered sugar. It hardens up nicely so is good for attaching decorations to a cake!
And there you have it! My first fondant cake.
The force was strong with me apparently.
And for all you young padawans…I hope this helps you to make your own little Yoda cake!
YODA CAKE
recipe from Julie Foxworthy
INGREDIENTS:
Two (2) 4.5 inch spring form pans
Duncan Hines Chocolate Cake Mix
Duncan Hines Chocolate Fudge Frosting
Eggs (for Cake Mix batter)
Oil (for Cake Mix batter)
Fondant (either make your own, or buy some already made)
Fondant/Cake Dye (I used green, black, and brown)
Cake Flavoring Oils (whichever you like, I used clear vanilla extract)
Cook’s Tip: You can buy Wilton’s fondant at most grocery stores that have a cake decorating / baking isle. Or if you feel like making your own (like I did), try this recipe. It’s what I used and it was really easy!
2 comments April 8th, 2008