Posts filed under 'food memories'

Yesterday, my 3 nephews (kyle-14, nathan-11, and jack-6) and my dad, all had their birthday party in a beautiful park in Linden, MI.
The boys had put in a request for me to bake some special cakes for them. In particular Darth Maul (from Star Wars), and a “Dark Knight” themed cake from the new Batman movie.
So Friday, I took the day off of work and just spent the day bakin’ it up!
My fiance, Christopher, (a Star Wars illustrator), came in very handy when it came time to do the serious decorating. His skills with a paintbrush and an exacto knife were amazing.
Take a look for yourself! They were a HUGE hit with the boys, and everyone at the party. YAY.

Check out the whole set off pics on my flickr here.
August 17th, 2008

So…it was about time that I attempted to create my first fondant cake, right? And what better reason than for my boyfriend’s 34th birthday!
I mean, I’ve been wanting to do one for a long time, but the fear of using fondant kept me away. But, to all those harboring the same fears I am telling you straight up, DON’T BE SCARED.
Once I got into it, it was really very easy and more importantly? SUPER FUN.
I decided to go with a Star Wars themed cake, since my boyfriend is an illustrator and 99% of his work is Star Wars related. I decided on Yoda because he seemed the easiest to pull off. He is all green practicallly, and has hard-to-miss features. So even if my attempt was a complete and utter disaster, chances were that it would still be somewhat recognizable.
I also knew that the cake would only be viewed/eaten by my boyfriend and I, so I didn’t want to make a huge cake, but I wanted something bigger than a cupcake too. So I compromised, and bought a couple 4.5″ spring form pans and went with a 2-layer 4.5″ round cake.
Planning the actual layout of the face wasn’t that difficult. I knew my skill level was definitely beginner, and so I kept things very simple. Two eyes, a nose, and a mouth, and of course those cute Yoda ears!
The ears presented the biggest problem, as I wasn’t sure how I was going to attach them to cake. I thought at first, that I would make them out of the fondant, and somehow use toothpicks to secure them in place once they had hardened up.
After I had a plan in place, things went pretty smoothly. I baked my cake (per package directions). Hey, boxed cake is pretty much foolproof, and I didn’t want the hassle of a homemade cake recipe going awry since I knew the fondant part would be tricky enough. So I kept the cake itself simple! And box cake is just tasty, come on, admit it.
After the cake was baked, I began to color and flavor my fondant. I added a few drops at a time (a little dye goes a LONG way, btw). Once I was cool with the color, I just kept kneading the color in until all of it was incorporated into a smooth mass, with no color streaks in it.
After I was finished coloring the green fondant, I rolled out a 12″ disc about an 1/8″ thick. This was what I was going to use to cover the cake, but before I did, I had to frost my cake to give the fondant something to adhere to. (It’s technically called a crumb coat).
I took my tiny cakes out of their cake pans, and cut the tops of the cakes completely even with a knife.I place the bottom layer on a cutting board, and frosted just the top of it. Then I added the 2nd layer, and frosted the entire cake with a very even layer of frosting. Now, I was ready for my fondant…
I carefully rolled up the fondant disc, and gently unrolled it onto the cake…and what happened next…was simply the best fluke ever. As I was smoothing on the fondant to the cake, I started smoothing it down in the front, and realized that the ears, could be created just by keeping the drapes of fondants on the sides. SO COOL. What a happy mistake.
After that was done, I just had to create the eyes, nose, and mouth. I printed out some images of Yoda that I found on Google Images, and used it to create the rest of the pieces.
For the eyes, I began with taking some of the white fondant, and making two white discs for the eyeballs. Then I colored just a tiny bit of the white fondant with some black dye, and another tiny bit of the white fondant with brown fondant. (These I used to make the irises and the pupils). I also added a tiny fleck of white fondant over the pupils to make them a little more realistic. Once I had the eyeballs done, I used some more green fondant to shape the upper and lower eyelids. I did the best I could, and created the “folds” of his lids by cutting lines into the fondant to look like wrinkles.
On to the nose. This was really just shaped out as close as I could get to the reference, and again, created some wrinkles with a knife.
For the mouth, I made two pieces. The upper part, and lower part. After I shaped them, I added more wrinkles with a knife.
I attached the pieces of the face using a simple mix of water and powdered sugar. It hardens up nicely so is good for attaching decorations to a cake!
And there you have it! My first fondant cake.
The force was strong with me apparently.
And for all you young padawans…I hope this helps you to make your own little Yoda cake!
YODA CAKE
recipe from Julie Foxworthy
INGREDIENTS:
Two (2) 4.5 inch spring form pans
Duncan Hines Chocolate Cake Mix
Duncan Hines Chocolate Fudge Frosting
Eggs (for Cake Mix batter)
Oil (for Cake Mix batter)
Fondant (either make your own, or buy some already made)
Fondant/Cake Dye (I used green, black, and brown)
Cake Flavoring Oils (whichever you like, I used clear vanilla extract)
Cook’s Tip: You can buy Wilton’s fondant at most grocery stores that have a cake decorating / baking isle. Or if you feel like making your own (like I did), try this recipe. It’s what I used and it was really easy!
April 8th, 2008
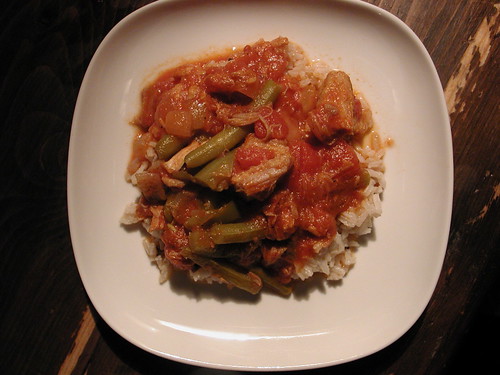
Among the many favorite Syrian comfort foods of mine, is a dish called Lubi Lu. It’s actual name is just Lubi…but my Grama Sanom used to call it Lubi Lu, I think to just make the name funnier.
Lubi Lu is an extremely simple dish to make, but SO flavorful and colorful. It’s a beautiful, warm, comforting dish to prepare on a cold, snowy Sunday just like today.
Essentially all Lubi is, is a stew made up of fresh green beans, tomatoes, green pepper, onion, and pork butt. It is typically eaten over rice, but is very good just eaten right out of a bowl.
There is a very important trick that my Grama Sanom taught my mother, and my mother taught me, and it applies to this recipe as well as any stew. And that secret trick is that when you add the liquid to simmer the meat, (whether it be water, or broth, or wine, etc) it must be boiling before adding it to the browned meat. The result will be meat that is extremely tender and melts in your mouth, as opposed to one that is chewy and tough.
Alright…so on to the recipe…
SYRIAN LUBI LU and RICE
Recipe from my mom, Gerri Foxworthy
INGREDIENTS:
3-4 lb lean pork butt roast (aka pork shoulder, can also use pork loin)
1 onion, chopped into 1/4″ dice
1 green pepper, chopped into 1/4″ dice
3 lb fresh cut green beans, ends trimmed, snapped in half
1 large 28 oz. can diced tomatoes in juices
1 small 6 oz. can tomato paste
Salt and pepper to taste
Boiling water to cover pork and green beans
INSTRUCTIONS:
(see flickr photo set for visual instructions here)
- Cube pork into 3/4 inch cubes, season with salt and pepper and brown meat in a little vegetable oil in dutch over or similar pot
- Add enough boiling water to cover bottom of pan, but do not completely cover meat with it.
- Cover pot and simmer about 30 minutes, or until meat is tender
- Add onion and green pepper, stir.
- Add green beans, stir.
- Add tomatoes and tomato paste, stir.
- Add enough boiling water to almost cover beans, stir.
- Add salt and pepper to taste
- Cover pot and simmer until beans are very tender (about 45 minutes)
- Serve over syrian rice
INGREDIENTS FOR RICE:
4 Tbsp butter, divided
1/4 cup orzo
1/4 cup pine nuts
2 cups rice
4 1/2 cups boiling water
Salt to taste
RECIPE INSTRUCTIONS FOR RICE:
- Melt 2 Tbsp butter in 3 quart saucepan
- Add orzo and pine nuts and saute over medium high heat until lightly browned
- Add rice to orzo mixture and stir until butter coats the rice
- Add boiling water to rice
- Season with salt (I usually use a teaspoon)
- Reduce heat to medium low, cover pot, and let rice cook for 20 minutes
- Remove lid, add last two tablespoons of butter, fluff rice with fork and cover again til butter melts
- Serve with Lubi Lu
Chef’s Notes:
Keep a separate pot of water boiling for both the Lubi and Rice before you begin your cooking, that way you won’t forget!
November 19th, 2006
When I was a girl, we used to spend Easter mornings at my Syrian grandparents house. It is one of those family traditions that gets seared into your brain, and the sounds, smells and memories of it, never EVER go away.
My memories of these Easter mornings (although there were sadly too few of them), were of warm baked easter bread, hunks of blue cheese, olives, and the cracking of the eggs, a Syrian tradition called what i can only spell as “ta-hoshing”.
The art of “ta-hosh” is where one person would tightly hold a festively dyed boiled egg in their hand while the other person would very lightly tap the other person’s egg with the top of theirs, trying to crack their opponent’s egg before their own. If one egg got cracked, the eggs were flipped, and the game would continue. The person who cracked both sides of your egg first, got to keep your egg.
My jiddu (grandfather in Syrian) was very highly skilled at the art of the tahosh and he would steal all my eggs within moments of the game beginning.
I was always amazed at the precision and consistency of his skills, until one Easter sunday…I learned his secret. It was all in the way one holds the egg. I never mastered his consistency, but eventually…as i grew older, I managed to steal a few of his eggs before all was said and done.
And for those among us, that felt the need to play dirty at it…my grama had secretly created some false eggs, made from ceramic, that would somehow always end up circulating the room. However, after being burned by this prank before, I quickly learned to always check for the validity of my opponents eggs before the tahosh began.
After the games had simmered down, and everyone had had their fill of the tahoshing…there would be trays of syrian easter bread, warm from the oven, smothered in butter or jam, eaten with a hunk of pungent blue cheese and a peeled hard-boiled egg with salt.
The house was always filled with so many people, as my family on my mom’s side is huge. Made up of literally swarms of brothers, sisters, aunts, uncles, cousins, cousins cousins, grand children, great-grandchidren, and yes…even great-great grandchidren. The hum and buzz of the activity, and the smells of this food permeating my grandparents cozy home…while I played and laughed and ate, those memories? Will remain with me forever. never to escape.
But my jiddu died when I was 11 years old. My grama, Mary, eight years later. And with my jiddu’s passing, so passed our family gatherings and much of our traditions. We tried to keep it up for a while, when my grama was still alive…but the family was growing larger, and moving farther apart, children were growing up and moving on. It’s so sad, but that’s pretty much how it happened. How the traditions I loved so much, got lost. But only for a while!
When I was old enough, and was missing these times spent with my grandparents, I started to seek out the things that reminded me of our time together. I found that a lot of my memories could be rekindled through food. And so I sought them out. These family recipes. Most of them were well-hidden and tightly kept to the dwindling few who could still remember them. These recipes were never written down. They were just done. Remembered like family folk lore, passed from generation to generation.
But sometimes…things get lost. And that’s what started happening to my Syrian family recipes. And to prevent that, I started having my mom help me gather up all her own memories and those of her siblings and aunts, and cousins, and nieces and nephews…and I started to gather them up, one by one. Some of them varied slightly from what I remember my grama’s tasting like, and so I would alter, and test, and taste, and try again and again…until I got them as close as possible to what I remembered.
This recipe came to me from my Uncle. And now, my grama’s easter bread (pronounced ah-das) has been written down into the vault.
And so it is with that, that I share it with you here. So that it never gets lost again. And so that it becomes part of new traditions, for anyone who wishes to make them. I hope you enjoy this bread.
SYRIAN EASTER BREAD
INGREDIENTS:
6 cups flour
1 1/2 TB sugar
2 Tsp Salt
12 oz can of evaporated milk
1 pkg rapid rise yeast (2 tsp)
1 TB. ground mahleb (can get from middle eastern markets)
2 sticks of butter
RECIPE INSTRUCTIONS:
- Dissolve yeast into 1/4 cup warm water and 1 tsp of sugar. Set aside for 10 minutes until bubbly and foamy
- Melt butter in sauce pan on low heat until just melted. Remove from heat and add evaporated milk to pan and stir. Add yeast mixture into the milk/butter mixture and stir to combine.
- Combine all dry ingredients. Add wet ingredients to dry, and knead well (by hand, or with dough hook in kitchen-aid mixer). Cover with wax paper and let rest 15 minutes.
- Knead again and then let rise until double in size. (I usually turn my oven on 200 for 2 minutes, shut it off and then put my dough in the warm oven to rise).
- Divide dough in half and make into two equal balls. Let dough rise again.
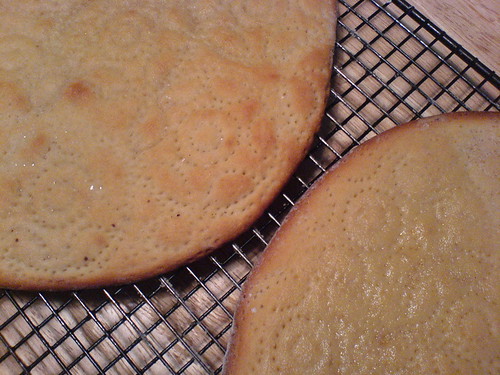
- When the balls have doubled, roll out each ball into a circle to about 1/2 inch thick
- Poke bread dough all over with a fork, or with a bread stamp (found at middle eastern markets)
- Brush with melted butter
- Bake at 350-375º for 20 minutes or until golden. (I let mine bake for 10 minutes on the bottom rack, and then move up to the middle rack for the last 10 minutes of baking)
- Remove from oven and brush with a layer of melted butter
Chef’s Notes:
This bread is great with butter and jam.
To reheat, pop in microwave for about 10 seconds.
Traditionally, in my family, we ate this bread on easter day with blue cheese, olives, and hard-boiled eggs.
July 30th, 2006