My Grama Dee was known for her sassy sense of humor and it’s no surprise that we have many memories of her hilarious quips and quotes over the years. This particular dessert was renamed after my cousin, Brian, came downstairs one afternoon, to find my Grama Dee making her infamous four layer dessert. When he asked what she was doing…she stood with a tiny paring knife, shaving off razor thin curls of chocolate off of one of my cousins’ leftover chocolate easter bunnies, and her response went into the family legends of Grama Dee quotes…
“Oh, I’m just makin’ me a little rabbit ass.”
And thereafter, the dessert was renamed…Rabbit Ass. Not the most appetizing of names, to be sure…but one that brings us many smiles whenever we make it…thinking of our beloved grama standing over her chocolate easter bunny…shaving it’s butt away.
So here’s the recipe…
Four Decker Mocha Dessert (aka “Rabbit Ass”)
Recipe from Doris Foxworthy
INGREDIENTS:
3/4 cup margerine or butter (I use butter)
1 1/2 cup flour
1 cup chopped nuts (I use walnuts)
3 Tbsp granulated sugar
1 – 8 oz package cream cheese, softened
1 cup sifted powdered sugar
1 – 4 oz tub of cool whip
1 small package instant vanilla pudding
1 small package instant chocolate pudding
3 cups whole milk
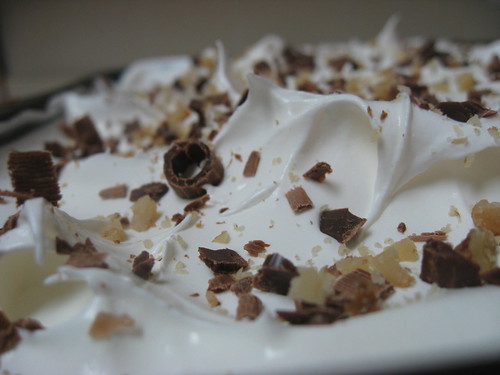
grated chocolate (I use a hershey bar, grama dee used “rabbit ass” hence the name)
RECIPE INSTRUCTIONS:
In a mixing bowl, cut butter into flour and granulated sugar until crumbly.
Add chopped nuts and mix up until you get them all incorporated into the dough
Press this dough into the bottom of a 12x9x2 baking dish (do not pack or press this mixture too tight into the bottom of the pan, or you will end up with a rock hard base which you won’t be able to cut through, believe me…I know from experience.)
Bake this at 350º for about 20 minutes until it’s just golden
Remove and cool on rack.
While the crust is cooling, mix together the creamed cheese, powdered sugar, and half of the cool whip (2 oz) until light and fluffy.
Once crust has cooled, spread the cream cheese mixture over crust and refrigerate or freeze until cream cheese layer hardens up.
Once cream cheese layer has set (about an hour or two in the fridge), mix together both packages of pudding and your milk until thickened.
Spread pudding layer over cream cheese layer and put back in the freezer or refrigerator to harden up
Remove from freezer/fridge and spread the last layer of cool whip (the remainder of the tub) to the top of the dessert. Make some nice poofy peaks with your spoon/rubber spatula
Shave up some chocolate curls from a hershey bar (or whatever chocolate source you like, easter bunnies?) and sprinkle over the cool whip layer.
I also like to add a few sprinkles of chopped walnuts to the top of mine as well, but you can omit the nuts if you don’t like them.
Enjoy!
May 19th, 2008
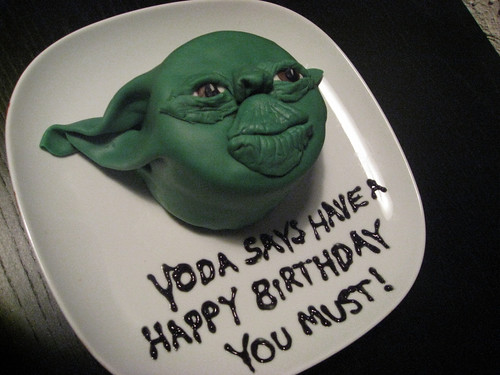
So…it was about time that I attempted to create my first fondant cake, right? And what better reason than for my boyfriend’s 34th birthday!
I mean, I’ve been wanting to do one for a long time, but the fear of using fondant kept me away. But, to all those harboring the same fears I am telling you straight up, DON’T BE SCARED.
Once I got into it, it was really very easy and more importantly? SUPER FUN.
I decided to go with a Star Wars themed cake, since my boyfriend is an illustrator and 99% of his work is Star Wars related. I decided on Yoda because he seemed the easiest to pull off. He is all green practicallly, and has hard-to-miss features. So even if my attempt was a complete and utter disaster, chances were that it would still be somewhat recognizable.
I also knew that the cake would only be viewed/eaten by my boyfriend and I, so I didn’t want to make a huge cake, but I wanted something bigger than a cupcake too. So I compromised, and bought a couple 4.5″ spring form pans and went with a 2-layer 4.5″ round cake.
Planning the actual layout of the face wasn’t that difficult. I knew my skill level was definitely beginner, and so I kept things very simple. Two eyes, a nose, and a mouth, and of course those cute Yoda ears!
The ears presented the biggest problem, as I wasn’t sure how I was going to attach them to cake. I thought at first, that I would make them out of the fondant, and somehow use toothpicks to secure them in place once they had hardened up.
After I had a plan in place, things went pretty smoothly. I baked my cake (per package directions). Hey, boxed cake is pretty much foolproof, and I didn’t want the hassle of a homemade cake recipe going awry since I knew the fondant part would be tricky enough. So I kept the cake itself simple! And box cake is just tasty, come on, admit it.
After the cake was baked, I began to color and flavor my fondant. I added a few drops at a time (a little dye goes a LONG way, btw). Once I was cool with the color, I just kept kneading the color in until all of it was incorporated into a smooth mass, with no color streaks in it.
After I was finished coloring the green fondant, I rolled out a 12″ disc about an 1/8″ thick. This was what I was going to use to cover the cake, but before I did, I had to frost my cake to give the fondant something to adhere to. (It’s technically called a crumb coat).
I took my tiny cakes out of their cake pans, and cut the tops of the cakes completely even with a knife.I place the bottom layer on a cutting board, and frosted just the top of it. Then I added the 2nd layer, and frosted the entire cake with a very even layer of frosting. Now, I was ready for my fondant…
I carefully rolled up the fondant disc, and gently unrolled it onto the cake…and what happened next…was simply the best fluke ever. As I was smoothing on the fondant to the cake, I started smoothing it down in the front, and realized that the ears, could be created just by keeping the drapes of fondants on the sides. SO COOL. What a happy mistake.
After that was done, I just had to create the eyes, nose, and mouth. I printed out some images of Yoda that I found on Google Images, and used it to create the rest of the pieces.
For the eyes, I began with taking some of the white fondant, and making two white discs for the eyeballs. Then I colored just a tiny bit of the white fondant with some black dye, and another tiny bit of the white fondant with brown fondant. (These I used to make the irises and the pupils). I also added a tiny fleck of white fondant over the pupils to make them a little more realistic. Once I had the eyeballs done, I used some more green fondant to shape the upper and lower eyelids. I did the best I could, and created the “folds” of his lids by cutting lines into the fondant to look like wrinkles.
On to the nose. This was really just shaped out as close as I could get to the reference, and again, created some wrinkles with a knife.
For the mouth, I made two pieces. The upper part, and lower part. After I shaped them, I added more wrinkles with a knife.
I attached the pieces of the face using a simple mix of water and powdered sugar. It hardens up nicely so is good for attaching decorations to a cake!
And there you have it! My first fondant cake.
The force was strong with me apparently.
And for all you young padawans…I hope this helps you to make your own little Yoda cake!
YODA CAKE
recipe from Julie Foxworthy
INGREDIENTS:
Two (2) 4.5 inch spring form pans
Duncan Hines Chocolate Cake Mix
Duncan Hines Chocolate Fudge Frosting
Eggs (for Cake Mix batter)
Oil (for Cake Mix batter)
Fondant (either make your own, or buy some already made)
Fondant/Cake Dye (I used green, black, and brown)
Cake Flavoring Oils (whichever you like, I used clear vanilla extract)
Cook’s Tip: You can buy Wilton’s fondant at most grocery stores that have a cake decorating / baking isle. Or if you feel like making your own (like I did), try this recipe. It’s what I used and it was really easy!
April 8th, 2008
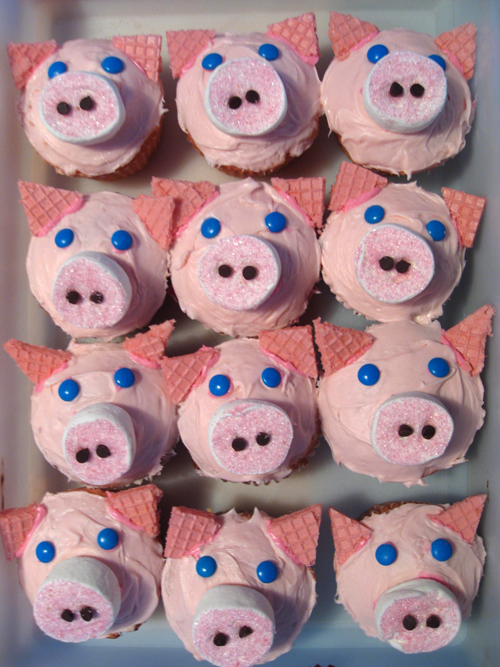
I LOVE CUPCAKES. I mean, who doesn’t right? They are little bites of heaven…and as my friend Matty Binks wisely wrote…”Whoever created the first cupcake deserves a Nobel Peace Prize.” Anyway…I love to make fun animal inspired cupcakes. I like to say they are for my nieces and nephews…but really…I make them for me because I love cute things. Especially sugary frosted baked goods type cute things! These little piglet cupcakes were inspired by some cupcakes I saw on Flickr. YUM. But after going to 50 different cake decorating stores, and not finding any pink candy chocolates…I had to improvise. I ended up with the following recipe:
PIGGIE CUPCAKES
recipe from Julie Foxworthy
INGREDIENTS:
Strawberry Cake Mix
Eggs (for Cake Mix batter)
Oil (for Cake Mix batter)
Strawberry Frosting
Marshmallows (Large)
Mini Chocolate Chips
Strawberry Pink Sugar Wafer Cookies
Bag of Mini M&Ms
Pink Decorator Sugar
RECIPE INSTRUCTIONS:
- Bake and frost cupcakes per package directions
- Slice big marshmallows in half, and dip the sticky side in the pink decorator sugar
- Drill two little holes (I used a wooden kabob skewer) into the marshmallow where you would like the nostrils to go
- Fill each nostril with an upside down mini chocolate chip (so the flat side is showing)
- Set aside snouts
- Cut strawberry wafers into triangle shape pieces with a sharp chef’s knife…(some of the wafers will pull apart from the cream filling, but I just kept cutting a bunch of them, until I had enough that had stuck together)
- Pick out a bunch of blue mini M&M’s out of the bag and set aside
- Assemble the Pigs by placing on the snout, the ears, and the eyes
- Enjoy!
January 30th, 2008
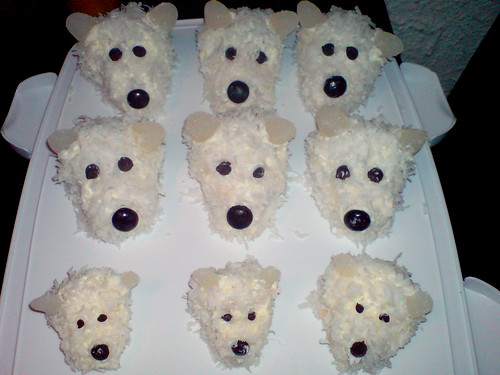
Every year in Plymouth, Michigan they have a pretty cool Ice Sculpture Festival, and every year I throw a party for my family and friends at my tiny little apartment (which is right downtown). It’s my one chance a year to really bust out and experiment with making a bunch of treats for my friends to fill up their bellies. This year, I decided that I needed to do some wintery/icy types treats…and in my vast searches, I found this amazingly cute recipe for making polar bear cakes. They were literally too cute to eat!
Check out the directions for assembly below.
Polar Bear Cakes
Recipe from FamilyFun.com
INGREDIENTS:
Light-colored cupcakes, 1 regular and 3 mini
White frosting
Shredded coconut
3 large and 2 small white gumdrops
1 Junior Mint candy
Chocolate chips, 4 regular and 4 mini
RECIPE INSTRUCTIONS:

- First, frost the top, sides, and bottoms of both a regular-size cupcake and a mini cupcake with white frosting. For each cupcake, frost the bottom first; then use a fork stuck into the bottom to hold the cupcake while you frost the rest of it.
- Roll the cupcakes in shredded coconut; then, working on waxed paper, set the cupcakes on their sides with the top of the smaller cupcake stuck to the bottom of the larger one to form the bear’s head.
- Add 2 horizontal slices from a large white gumdrop for ears, a Junior Mint candy for a nose, and 2 chocolate chips for eyes. For each cub, frost a mini cupcake and a large gumdrop, then roll them in coconut and arrange them on their sides as shown. Add 2 horizontal slices from a small white gumdrop for ears, a chocolate chip nose, and 2 mini chocolate chip eyes.
January 29th, 2008
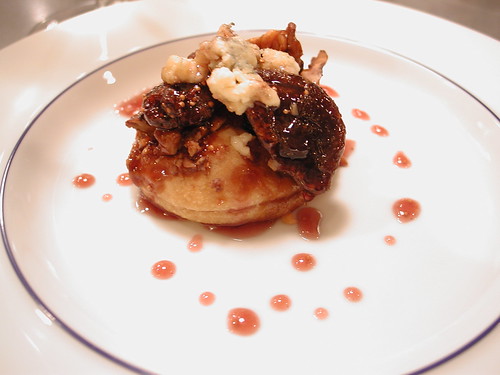
Every so often, my friends and I gather and have little “cooking parties”, this appetizer was something I whipped up at one of these soirés. The recipe was taken off of Epicurious.com and I have to say this little dish was quite delicious.
However, in the future, I would serve this as Epicurious recommends as an after-dinner dessert (instead of appetizer), since it’s sweetness along with the strong flavor of the cheese lends itself to an upscale dessert.
Warm Black Mission Fig, Walnut Crunch, and Blue Cheese Tartlets
Recipe taken from Epicurious
INGREDIENTS for Walnut Crunch:
2 tablespoons honey
2 tablespoons sugar
1 tablespoon butter
1/8 teaspoon ground cinnamon
1/8 teaspoon salt
6 tablespoons chopped toasted walnuts
INGREDIENTS for Figs and Puff Pastry:
1/2 cup sugar
1 tablespoon water
Pinch of salt
9 fresh figs (preferably black Mission), stemmed, cut lengthwise in half
1/4 cup (1/2 stick) unsalted butter
1/2 cup ruby Port
1 sheet frozen puff pastry (half of 17.3-ounce package), thawed
3 ounces La Fourme d’Ambert or Stilton blue cheese, diced or coarsely crumbled, room temperature
Honeycomb or honey
RECIPE INSTRUCTIONS for Walnut Crunch:
Stir honey, sugar, butter, cinnamon, and salt in medium skillet over medium heat until sugar melts. Cook until mixture boils and is deep golden brown, about 3 minutes. Mix in walnuts. Pour out onto sheet of foil; cool completely. Chop walnut crunch into small pieces. Can be made 2 days ahead. Store airtight at room temperature.
RECIPE INSTRUCTIONS for Figs and Puff Pastry:
Stir 1/2 cup sugar, 1 tablespoon water, and salt in heavy large skillet over medium heat until sugar is evenly moist. Cook until sugar begins to turn golden, stirring occasionally, about 4 minutes (mixture may be granular). Place figs in sugar mixture, cut side down, and cook until figs begin to release juice, about 3 minutes. Add butter; swirl skillet to melt. Remove skillet from heat. Add Port and let stand 5 minutes. Using slotted spoon, transfer figs to plate and cool. Return syrup to boil, whisking until smooth. Cool syrup completely. Figs and syrup can be made 1 day ahead. Cover separately and chill. Rewarm syrup before using.
Preheat oven to 350°F. Line baking sheet with foil. Roll out thawed puff pastry on lightly floured surface to 12×8-inch rectangle. Using 3 1/2-inch round cutter, cut out 6 rounds; arrange on prepared sheet. Divide walnut crunch among pastry rounds. Top each with 3 fig halves, cut side up.
Bake tartlets until pastry is puffed and golden, about 30 minutes. Tartlets can be made 2 hours ahead. Let stand at room temperature. Rewarm at 350°F for 8 minutes.
Arrange cheese atop warm tartlets. Brush or drizzle with warm Port syrup, then top with cube of honeycomb or drizzle with honey.
January 17th, 2008